HP smart tank 530, 500, 600 Printers - Paper Jam Error
HP smart tank 530, 500, 600 Printers - Paper Jam Error
This document is for HP Smart Tank 530, 531, 538, 615, 617, 618, and
Smart Tank Plus 570, 571, 651, and 655 Wireless All-in-One
printers.
During a print job, the printer stops feeding pages, and a Paper
Jam error message displays on the printer control panel.
NOTE:Paper jams can be real or false. The printer might report a paper jam even when there is no jammed paper. The following steps apply to both real and false paper jams.
Step 1: Clear jammed paper from the printer
Paper jams can occur in multiple areas of the printer. If you cannot find
the paper jam in one area, continue to the next area until the jam is
located.
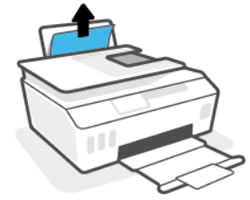
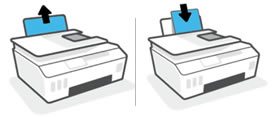
Clear jammed paper from the input tray
Remove any jammed paper that is accessible from the input tray area.
-
Use both hands to remove any jammed paper from the input tray.
-
Remove any torn pieces of paper or foreign objects from inside the input tray.
-
Touch OK on the control panel to resume the print job.
If the error persists, check for jammed paper in another area of the
printer.
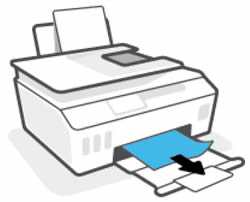
Clear jammed paper from the output tray area
Remove any jammed paper that is accessible from the output tray area.
-
Use both hands to remove any jammed paper from the output tray.
-
Remove any torn pieces of paper or foreign objects from inside the output tray.
-
Touch OK on the control panel to resume the print job.
If the error persists, check for jammed paper in another area of the
printer.
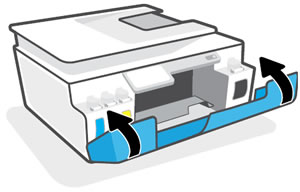
Clear jammed paper from inside the printer
Open the printer, and then remove any jammed paper that is accessible
from the printhead access area.
-
Close the output tray extender, and then close the output tray.
-
Open the front door, and then open the printhead access door.

-
Use both hands to remove any jammed paper from inside the printer.

-
Remove any torn pieces of paper or foreign objects from inside the printer.
-
Close the front door.
-
Pull out the output tray.
-
Touch OK on the control panel to resume the print job.
If the error persists, check for jammed paper in another area of the
printer.
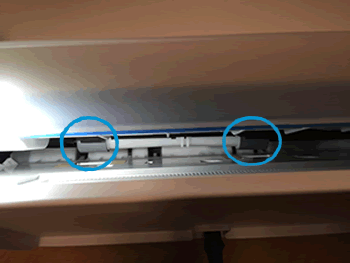
Clear jammed paper from underneath the printer
Remove any loose or jammed paper that is accessible from underneath
the printer.
NOTE:These steps involve setting the printer on its back. To avoid ink leakage, do not keep the printer in this position any longer than it takes to clear the jam.
-
Close the output tray extender, and then close the output tray.
-
Remove any paper from the input tray, and then lower the input tray.
-
Make sure all ink caps are closed.

-
Turn off the printer, and then disconnect the power cord and any other cables.
WARNING:
To avoid risk of injuries or electric shock, you must disconnect the power cord before reaching inside the printer. -
Lift the printer, and then set it on its back to expose the underside.
-
Locate the cleanout door on the bottom of the printer, and then pull the tabs to open it.
-
Use both hands to remove any jammed paper from the cleanout area.

-
Remove any torn pieces of paper or foreign objects from the cleanout area.
-
Close the cleanout door.
-
Carefully place the printer in the upright position.
-
Reconnect the power cord and any other cables to the rear of the printer, and then turn on the printer.
-
Lift the input tray, and then load paper.
-
Pull out the output tray.
-
Touch OK on the control panel to resume the print job.
If the error persists, check for jammed paper in another area of the
printer.
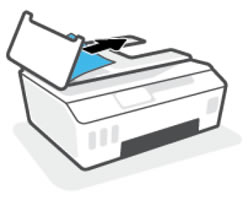
Clear jammed paper from the automatic document feeder
Clear jammed paper from the automatic document feeder (ADF).

-
Lift the cover of the ADF.

-
Use both hands to remove any jammed paper from the ADF rollers.
-
Remove any torn pieces of paper or foreign objects from inside the ADF.
-
Close the ADF cover.
-
Touch OK on the control panel to resume the print job.
Try to scan or copy from the ADF. If the error persists, check for
jammed paper in another area of the printer.
If the error persists after checking all paper paths, continue to the next
step.
Step 2: Clean the paper feed rollers
Dust, paper fiber, and other debris might accumulate on the paper feed
rollers and cause paper jams and paper feed issues. Clean the rollers
inside the printer, and then try to print again.
-
Turn off the printer, and then disconnect the power cord and any other cables.
WARNING:
You must disconnect the power cord before reaching inside the printer to avoid risk of injuries or electric shock. -
Raise the input tray, and then lift and hold the input tray shield.
CAUTION:
Do not remove the input tray shield. The input tray shield prevents foreign debris from falling into the paper path and causing paper jams. -
Look inside the open input tray, and then find the gray paper pick rollers.
-
Dampen a long cotton swab with distilled water, and then squeeze out any excess water.
-
Press the swab against the rollers, and then rotate them upward with your fingers. Apply a moderate amount of pressure to remove dust or dirt buildup.
-
Allow the rollers to dry for 10 minutes.
-
Reconnect the power cord and any other cables to the rear of the printer.
-
Turn on the printer.
Try to print. If the error persists, continue to the next step.
Step 3: Reset the printer
Sometimes a paper jam error persists even though there is no jammed paper
(false paper jam). Reset the printer, which might clear a false paper jam
error, and then try to print again.
-
With the printer turned on, disconnect the power cord from the printer.
-
Unplug the power cord from the power source.
-
Wait 60 seconds.
-
Reconnect the power cord to a wall outlet and to the printer.
NOTE:
HP recommends plugging the printer directly into a wall outlet.
Try to print. If the error persists, continue to the next step.
Step 4: Service the printer
Service or replace your HP product if the issue persists after completing
all the preceding steps.
Go to Contact HP Customer Support to schedule a product repair
or replacement. If you are in Asia Pacific, you will be directed to a
local service center in your area.
https://support.hp.com

Comments
Post a Comment